Editing BACnet schedules
The following topics cover changing a schedule in a BACnet controller.
Adding and changing times and values in BACnet schedules
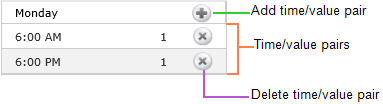
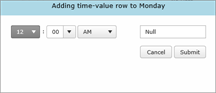
The daily times and values in a BACnet weekly schedule are edited in the Time-Value dialog.
Daily time/value pairs in a Weekly Schedule
Time-Value dialog
| 1 | In a weekly schedule page click the add to web icon |
| 2 | Make changes to the Time/Value pair. |
| 3 | Click Submit when finished or Cancel to leave the row unchanged. |
| 4 | Click Submit in the Weekly Schedule view to save the changes in the controllers. |
| 1 | Select the row. |
| 2 | Click the delete icon |
| 3 | Click Submit in the Weekly Schedule view to save the changes in the controllers. |
| 1 | Click Submit when finished or Cancel to leave the row unchanged. |
| 2 | Click Submit in the Weekly Schedule view to save the changes in the controllers. |
| 3 | Make changes to the Time/Value pair. |
| 4 | Double‑click on the row to change. |
Changing the effective period and default value
Use the Edit General Schedule Info dialog to change the effective period or default value of the schedule.
General Schedule Information dialog
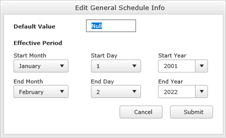
Default Value Each day in a weekly schedule covers a 24–hour period. The Default Value defines the state of the schedule between 12:00 a.m. (midnight) and the first time/value pair in a daily schedule list. The present value of the schedule remains at the value of the last time/value pair until 12:00 a.m.
Effective Period Set the effective period of the schedule with Start Time and End Time.
To change the general information:
| 1 | In a Weekly Schedule view, click the |
| 2 | Make the changes. |
| 3 | Click Submit when finished or Cancel to leave the information unchanged. |
| 4 | Click Submit in the Weekly Schedule view to save the changes in the controllers. |
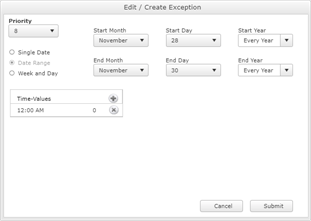
Changing exception schedules
Use an exception schedule to override the values in a BACnet weekly schedule. Exception schedules are selected or added from the Exception Summary list.
To open the summary list from a weekly schedule page, click ![]() .
.
Exception Summary list

| 1 | From the Exception Summary page, double-click an exception schedule to choose an exception schedule from the list. |
| 2 | Make changes and then do one of the following: |
- Click Submit when finished.
- Click Weekly Schedules to leave the information in the list unchanged.
| 3 | Click Submit in the Weekly Schedule view to save the changes in the controllers. |
| 1 | From the Exception Summary page, click the add icon |
| 2 | Enter the priority and effective times and dates. |
| 3 | Make changes and then do one of the following: |
- Click Submit when finished.
- Click Weekly Schedules to leave the information in the list unchanged.
| 4 | Click Submit in the Weekly Schedule view to save the changes in the controllers. |
| 1 | From the Exception Summary page, click the delete |
| 2 | Make changes and then do one of the following: |
- Click Submit when finished.
- Click Weekly Schedules to leave the information in the list unchanged.
| 3 | Click Submit in the Weekly Schedule view to save the changes in the controllers. |
The Exception Schedule dialog includes the following choices for setting dates.
Single Date A single date on which the values and times listed in the exception schedule will override the values of the weekly schedule.
Date Range A range of dates on which the values and times listed in the exception schedule will override the values of the weekly schedule.
Week and Day A day of the week and month on which the values and times listed in the exception schedule will override the values of the weekly schedule.
Priority Sets the order of precedence for conflicting exception schedules. For example if Exception Schedule 2 has an event priority 8 and Exception Schedule 4 has an event priority of 10, then Exception Schedule 2 will override Exception Schedule 4 when there is a conflict in the values for the reference object.
Time-Values The method for entering time/value pairs in an exception schedule is the same method used in a weekly schedule.
Web Exception Schedule dialog